Saturday, June 30, 2012

A Simply Pretty Salad

This week in our CSA pick up we got some more lovely greens 'n things so tonight we made one of the prettiest salads ever with some of the contents.

Roasted beets, goat cheese, greens, flowers, tomatoes, and a few bean sprouts....


It didn't need any dressing.


It was just that tasty and lovely.


It was the perfect meal before family movie night!


Until next time, stay warm and eat well.

Friday, June 29, 2012

Canada Day Eats Part 6: The Final Frontier

Hi Everyone. Such a big day today!! The last day of school for the summer a guest spot on a television show, and the Boy is having all 4 of his impacted wisdom teeth extracted today....not too sure if I will be able to top that for the rest of the summer. I just may need a vacation from my summer vacation!

I will post the link to the show when it is available!  And now the link is available!!! Just click on the link labeled "Canada Day Eats" on the right side of the screen.

All week I have been posting my test recipes for a Canada Day celebration to gear up for my spot on CTVmorning live Friday morning.  The Boy and Hubby have had the oh so difficult job of tasting all the food and everything has passed inspection. As I posted this week, I made sure to link it to this post so that everything was on one page to make it easy for people to find.

So here it is, after a week of brainstorming, writing, cooking, tweaking, and rewriting, here is the menu, with the links:

Planning ahead - Things to think about when planning a BBQ/outdoor party.

Bison Cheese sliders on bannock   Printable recipe here

Beer marinated steak skewers   Printable recipe

Grilled potato wedge poutine

Wild rice salad    Printable Recipe

Ketchup chips (because let's face it, these are truly Canadian!)

Maple Cream Cookies     Printable recipe

Bacon Maple Cheesecakes    Printable recipe

Red & White Vanilla cupcakes   Printable recipe

Various drinks to keep people quenched.  Go for a selction of Canadian, local beers, sodas, and juices.


There is one last recipe that I haven't posted yet so I am going to add it here. Keep in mind that this wild rice salad can really be anything you want. Use whatever veggies you have on hand and whatever vinagrette tickles your fancy. You are never bound directly to the recipe. If you want more feta or more dressing then you should do just that!

Wild Rice Salad  

For this salad, I used a wild and brown rice mix I found at the store but if you have straight wild rice and want to use just wild rice, go wild and do that.

1 cup rice/wild rice (that's the uncooked rice measurement)

Cook rice according to package directions then set it aside to cool.

While the rice is cooling chop up your favourite assortment of veggies.  Today I used:

½ red bell pepper
½ yellow bell pepper
¼  purple onion
A handful of bean sprouts
A handful cherry or grape tomatoes, cut in half
A small bunch of parsley or any herb you like

To this I added:

½ cup crumbled feta cheese
½ cup chopped sundried tomatoes
¼ cup balsamic dressing (Feel free to use whatever vinaigrette style dressing you like, it doesn’t have to be balsamic.  Greek, Italian, red wine vinegar....)

I hope you all enjoy your Canada day, no matter what you decide to do or cook up. Happy 145th to everyone!!

Until next time, stay warm and eat well!

Thursday, June 28, 2012

Canada Day Eats Part 5 - Happy Canada Day, Cupcake!

While I was baking away mass quantities of cupcakes for another occasion this week, I was able to save some batter from the vanilla cupcakes, colour some of it red, and scoop alternating white and red batter into cupcake liners....voila! Canada Day cupcakes!


Use your favourite vanilla cake recipe (or boxed if that's how you roll), divide your batter in half (I always suck at the half thing so if you end up with a couple of cupcakes all one colour, just roll with it).

To half of the batter, add red food colouring gel (gel won't water down the batter). I used the Wilton brand that I buy at Bulk Barn. You will have to use an alarming amount to keep from getting pink batter but adding a tablespoon or two of cocoa powder will help take the pink edge off.


I use a scoop that fills half of the cupcake liner so I used 1 scoop of white and 1 scoop of red then use a toothpick to swirl the colours together.


Bake according to your recipe's directions.

Here's the recipe  I used:

Vanilla Cake Printable recipe
Preheat oven to 350
Butter and flour the pan(s) of your choice.
Ingredients
In a bowl, combine:
  • 6 cups all-purpose flour
  • 6 tsp baking powder
  • 1 tsp baking soda
  • 2 tsp salt
Measure out and set aside:

·         3 cups buttermilk

In the bowl of your stand mixer (or a bowl with a hand mixer) cream together:
  • 2 cups unsalted butter, at room temperature
  • 3 cups granulated sugar
Add and continue to beat:
  • 8 eggs at room temperature (one at a time)
  • 8 tsp vanilla
Alternate additions of ½ of the flour with ½ of the buttermilk; this way you start and end with adding the flour mixture.  Mixt well so there are no lumps but not too long, keep a close eye.
When filling your pans, make sure to stop at no more than ¾ full.
Bake in the centre of the oven for 20 to 30 minutes.  This time varies greatly because it does depend on the size(s) of pans you have used.
Remove pans to a rack, cool for 15 minutes, then remove cake from pans to cool completely before icing.
(15 minutes for cupcakes)

Use your favourite icing recipe (or a container of white store bought icing) to ice the cupcakes. If you'd like to swirl the red in, you will need a piping bag, a large star tip, and a some more of the red food colouring gel.

Paint the inside seams of the bag with the colour of gel you want to show on the icing.
Once you have painted the inside seams of the bag, fill the bag with icing and start piping swirls of icing using  a steady, even pressure.


Until next time, stay warm and eat well!

Wednesday, June 27, 2012

Canada Day Eats Part 4 - Poutine!

Raise your hand if you think of poutine when you think of Canadian food? (My hand is up.) Now raise your hand if every now and then you crave poutine? (My hand is up.) Okay, confession time is over. For Canada day I figured we needed some good old poutine but I don't want to fuss with deep frying the fries.  You can certainly bake them in the oven but if the BBQ is already hot and ready to go why not cut your russets into wedges, toss them in a little canola oil, and slap 'em on the grill?


Now for the cheese curds and gravy portion. I haven't made a roast lately and do not have the drippings to make a gravy.  I have chicken stock in the freezer but that just wouldn't make a proper gravy for this. I am actually resorting to a mix (some shame, but not lots, this is a time saver). Did you know that Clubhouse is a Canadian company founded in 1883 in London, Ontario? Why not use a Canadian product to help you out on Canada Day?  Basically use a gravy (or mix) that you (and your guests) will like. I am not here to judge.

(Clubhouse even makes a poutine gravy mix.....just sayin')

Grilled Potato Wedge Poutine

6 Russet Potatoes
Cheese Curds
Gravy of your liking
Canola Oil
Salt and Pepper

Scrub the Potatoes well  and pat dry. Cut each potato into 12 wedges and place in a bowl.


Drizzle with canola oil and toss to coat all of the wedges. Season with salt and pepper.


Place the potatoes a medium-high grill and close the lid.  Check after about 10 minutes. While the taters are cooking, prepare the gravy and get the cheese put in a bowl for sprinkling on the hot taters.


Flip the potatoes and continue to cook until golden brown and tender in the middle.


Pile some wedges onto your plate, top with cheese, the slather on some hot gravy!! Give a minute or 2 for the cheese to get all melty.

Enjoy!!
(these go soooo well with any BBQ or just on their own....)

Until next time, stay warm and eat well.

Tuesday, June 26, 2012

Canada Day Eats Part 3 - Planning Ahead

 So you're planning a back yard BBQ to celebrate Canada's 145th birthday, eh? It's not enough to just plan a menu, or tell people what to bring. We must consider the outdoor elements and plan accordingly. We generally want our guests to be well looked after and have a relaxing time...that's not too much to ask, is it?  My mind starts going on overdrive when I know people are coming to spend the day and most of the evening in my back yard. The are so many darn things to consider.


Some things to think about when planning a back yard gathering:

-Check the weather!!! Is there the threat of having to move indoors and if so, is there room for everyone?

-Perhaps some tents or gazebo type of shelter would be helpful. Even umbrellas are helpful. (check with people you have invivted, perhaps someone has a portable gazebo)

-Seating.  Where will everyone sit? Do you need to tell them to bring a lawn chair? Some people may like sitting on blankets on the ground.

-Tables. Who has enough tables sitting around for everyone to have room? Perhaps a friend has an extra folding or card table they can bring with them. Or plan food and snacks to be portable or lap friendly. (ie able to eating while sitting with the plate on your lap)

-Bugs. Need I say more? Provide guests with some protection from mosquitos. Whether it is a couple cans of spray, citronella candles, those little coils, or whatever you use that helps keep the little critters at bay.

-Lighting. If you will be in the yard past sundown, you will need some lighting so people can see each other.  if your lighting is by way of bonfire, make to check local bylaws about bonfires first.  Other lighting can come from setting up your christmas lights along the fence, candles in jars, or even the funky Tiki torches.

-The menu. When thinking about the menu, keep in mind ease of eating and mingling.  Generally backyard parties aren't sit down formal things but wander around and mingle types of gatherings.

-Music. Don't allow your teen to play his crappy metal music. Play a nice set list of various music....perhaps an all Canadian musician play list would be nice here....

- Keeping things chilled.  Not only the astmosphere, but the food needs to be kept at proper temperatures to keep everyone safe.  Drinks can be tossed into a cooler or a bucket of ice but try placing bowls or platters of food on a bed of ice.  You can easily find large trays to mound ice in and then nestle the serving bowls into.  Keep the replenishing the ice as necessary

-Oh! Check the gas on your BBQ!! I actually ran out the other night and Hubby had to make the propane run for me while getting things grilled for my other posts....oops. Have a back up plan or an extra tank, or fill up your tank.

I have probably missed some things but feel free to let me know, just be nice about it.

A quick note about today's CSA haul.  This week our CSA has provided us with:

Mixed greens with flowers


 Salad turnips and beets

 Garlic scapes, green onions, cilantro, and a bunch of lovely herbs!

 
So excited to get these into lunches this week!

Until next time, stay warm (with the AC on) and eat well!

Monday, June 25, 2012

Canada Day Eats Part 2

Still testing out recipes for Canada Day in the Little Kitchen....Today's experiment was with beer....a truly Canadian beverage! When I was brainstorming ideas the other day, I knew beer needed to be incorporated not only as a drink but in the food as well and what better way to use the beer than to marinate some Canadian beef?

The Bison burgers were a hit but bison meat is expensive and may not be a feasible option when feeding a crowd.  One option if you want burgers is to use ground beef instead of bison.  A second option is to buy an inexpensive cut of steak, marinate it, cut it into strips, and thread them onto skewers.  Skewers are a great way to stretch meat when you need a few more servings.  I found a package of inside round marinating steaks at Costco for about $19.00. The steaks were thick cut and perfect for slicing for skewers.


Beer marinated Steak skewers

1 can or bottle of beer (a stout would go well here)
1 onion, sliced
2 cloves garlic, crushed or grated on micro-plane
 1 tsp dry mustard powder
Pepper - Fresh ground, as much as you like
1 round steak (or other marinating steak of your choosing: I used and inside round marinating steak)
a whole bunch of bamboo skewers

Trim the steaks of any visible fat or silvery skin (this stuff just means chewy steak) then place the steak into a zip top freezer bag (or other container for marinating).
This is maybe 1/4 of the steaks in the package...probably a little less than 1/4

Place in the fridge for a couple of hours, or overnight. (You can cut the steak into strips for skewers then marinate the strips. This would be good if you are planning on marinating for a short time.)

Take the steak out of the marinade, pat it dry and place the steak in the freezer to firm up while you soak the wooden skewers in water (soaking the wooden skewers helps prevent them from burning).
                                 
After 15 minutes in the freezer, the steak will be firm enough to slice thinly and neatly so take the steak out of the freezer and using your sharpest knife, slice the steak thinly (less than ½cm but not paper thin).

After slicing and letting the skewers soak for half an hour, thread the steak strips onto the skewers, sprinkle with a healthy dose of fresh ground black pepper and some salt.

BBQ until cooked through. (If you find the skewer handles are burning, place tin foil under the ends.)
We'll talk about those potato wedges another day.

Serve with your favourite steak sauce for dipping!

Until next time, stay warm and eat well.

Saturday, June 23, 2012

A Simple Dinner is a Tasty Dinner

Tonight's quick dinner was a lovely salad using our CSA greens, radishes, turnips, micro greens, green onions and some other items from the fridge such as grape tomatoes and peas topped with a runny yolk egg and 2 slices of locally sourced bacon.  Simple, tasty, and it just hit the spot!

Hubby added some pickled asparagus to his salad!
And now we're off to a good old Manitoba social! (A big party with food, drinks, dancing, and a silent auction.)

Until next time, stay warm and eat well!

Wednesday, June 20, 2012

CSA Week 1

Yesterday Hubby picked up our first basket of goodies from our wonderful community supported agriculture program with Almost Urban.  We were so excited when we got the email telling us of our first pick up. As it is early in the growing season, and we have had large amounts of rain, our first basket is mainly leafy greens that will pump up our mason jar salads.

Some radishes and salad turnips were in there as were mixed greens with edible flowers,

lovage, chard, spring onions, garlic scapes, a bouquet of flowers, dill,


A bag of micro greens (Sunflowers)


and a bar of soap!

We know as the growing progresses we will get more and more wonderful goodies in our basket.  For now our salads have some extra fresh & local flavour and we get to try some things we haven't had before (such as edible flowers and lovage....)

We are so looking forward to getting new things each week this summer!

In other news: CTV Morning Live has invited me back to their show! Next week (July 29) I will be discussing Canada Day inspired edibles for your celebrations!! I am so excited!!

Until next time, stay warm and eat well!

Sunday, June 17, 2012

Mason Jar Salad- End of the Week

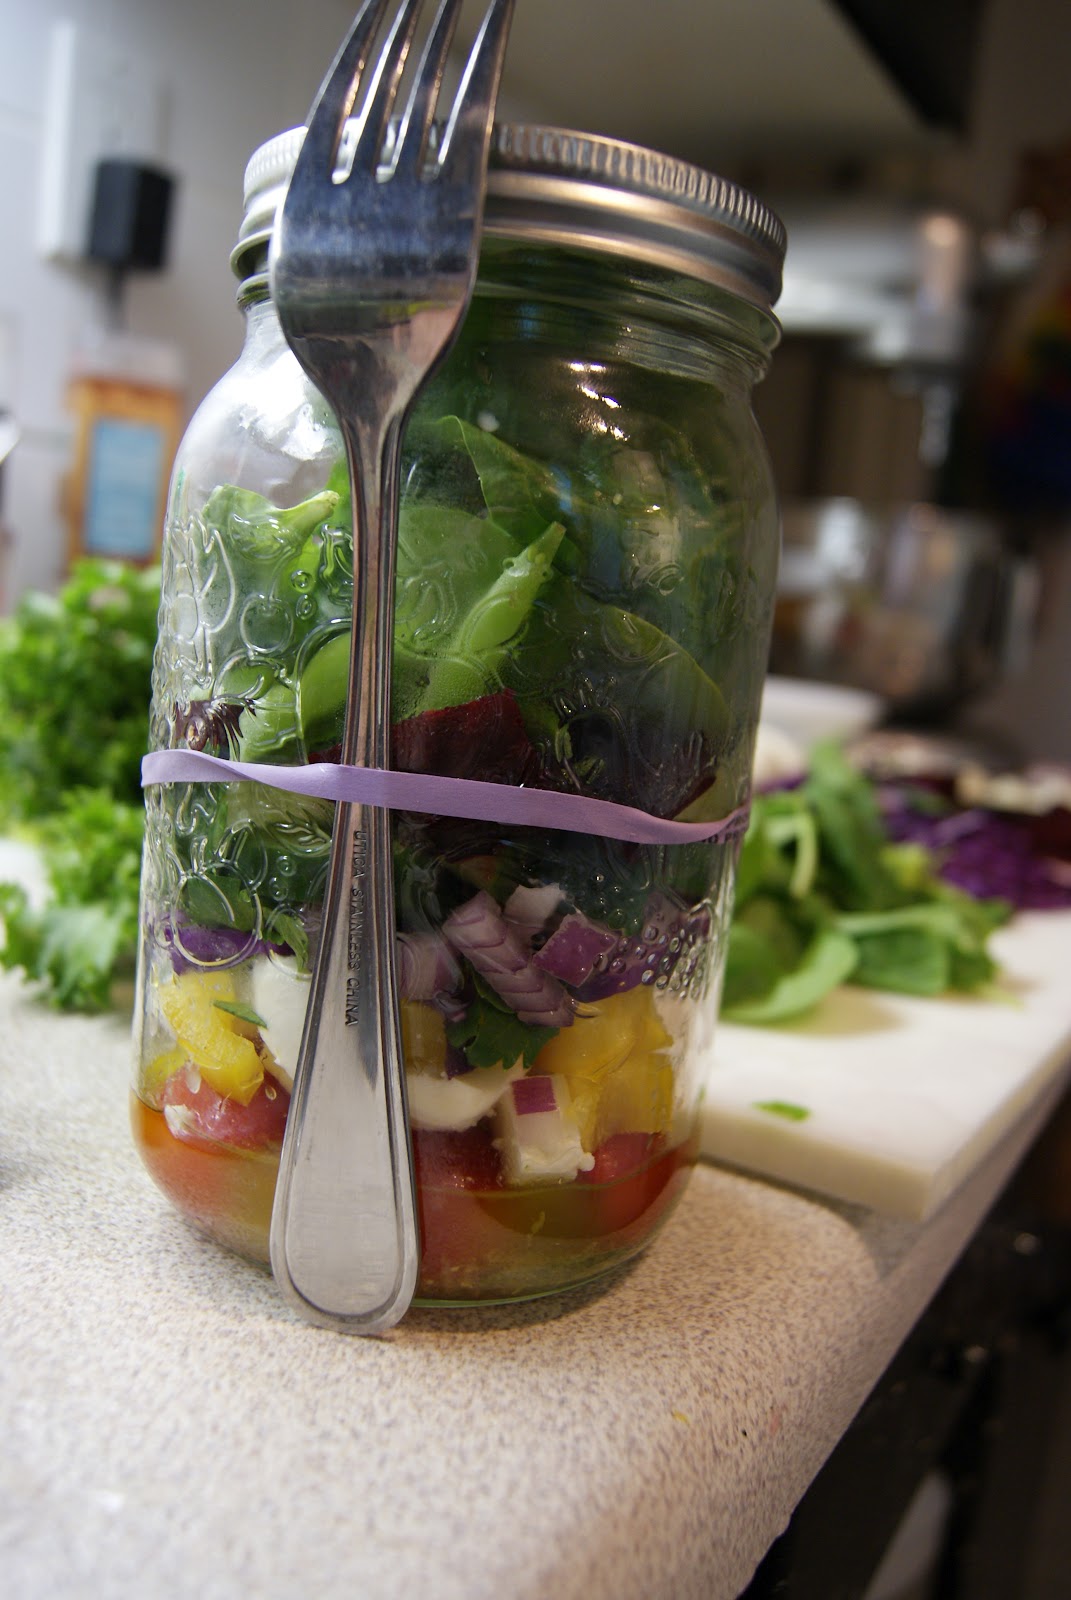
I survived grade 8 camp!!! There were wood ticks (too many to count), whiny kids, fun activities, kids who didn't sleep, and all sorts of strangeness. I even conquered the zip line! I have photos of that but since the harness is in no way shape or form flattering, I refuse to show them but I did it!  I am still catching up on sleep though. I hope to be all caught up by Monday! Unfortunately I did not bring any mason jar salads with me to camp (I really should have).  Fortunately Hubby made salads to get him through the week. He reports that the salads did indeed remain fresh and tasty the whole week. We are going to keep trying these out with some different combinations.

Friday's supper was a super simple tomato basil pasta using a recipe from Jamie Oliver's book "Jamie's Food Revolution". I sort of followed the recipe, making only a few adjustments to use up some things in my fridge.


While at the Red River General Store the other week, we picked up some locally made pasta. We chose a sun dried tomato fettuccine pasta. (If you haven't been, the Red River General Store is all about local, fresh products and lots of antiques! We bought asparagus from a farm in Thompson, MB, wild rice from Northern Manitoba, maple syrup from Mcreary, and Pasta From Steinbach, Manitoba!!! We pretty much covered 4 corners of the province in just one stop)


Okay, back to the recipe. (Sorry about that)

 Classic Tomato Spaghetti (page 43 in Jamie's Food Revolution, Jamie Oliver)
Printable recipe here

2 cloves garlic (I used 3)
1 red or green chile (I used dried because that's what I had)
 a small bunch of fresh basil (from the garden)
1 pound dried spaghetti (Or any noodle you'd like)
olive oil
1 can diced tomato (recipe said 14 oz, but I used a 28 oz can)
sea salt and pepper
Parmesan cheese (I had fresh mozzarella but no parm so I used that instead)

Peel and thinly slice the garlic and the chile (if using fresh). This is also a good time to wash and dry the basil.

Get the water for the past boiling and salted and get a skillet over medium heat. Drop the pasta in the water and then add 2 tbsp of olive oil to the skillet.  Add the garlic and chile to the oil and stir things up.  Once the garlic begins to brown, add most of the basil leaves and the tomatoes and season with salt and pepper.
As soon as the pasta is cooked, drain it and transfer to the skillet and stir it all up.

At this point I added some spinach to the pasta and some torn up fresh mozzarella (Because why not?).

Slice up the rest of the basil and top it off.

Let me tell you, rave reviews on this one.  The pasta had such a fabulous consistency.  I couldn't really taste the sun dried tomato but the pasta itself was fabulous. I will be buying it again.

I did manage to plant my celery that I had in my window sill.


Some other news in the Little Kitchen: Tuesday we pick up our first week's worth of fresh farm produce from our CSA. We joined a community supported agriculture program for the summer and are excited to see what we get this week.

In the mean time, I'm gonna go make some more jar salads!!

Until next time, stay dry and eat well!!!

Monday, June 11, 2012

Mason Jar Salad: Day 1 (And Banana Muffins)

Today's jar salad was fantastic! (It was also the talk of the staff room for both Hubby and I.)  I managed to leave enough room for a good shake an successfully mixed it all up! The lemon vinaigrette was perfect.  The beets managed to colour everything a nice shade of purple too! Of course today was day one. Hubby has a couple more salads in the fridge for his week but I am leaving for 2 days of camp with the grade 8s tomorrow so I didn't make more. I am however tempted to make a couple to take and store in the camp fridge. (I'm not sure if I can handle mass produced camp Cesar salad...)


In keeping with my experimenting theme, I decided to make some banana muffins to take with me to camp. That wasn't the experiment. The experiment was switching out the white sugar for maple syrup! I researched a bit online and decided to use 1 cup of maple syrup in exchange for 1 1/4 cups white sugar. I also added an extra 1/4 tsp baking soda and another 1/3 cup flour. Oh, I also only used 2 tbsp of canola oil instead of 1/3 of a cup and I have a sneaky suspicion that I may be able to omit the oil altogether!

Here's the recipe....and FYI, I'm not sure these guys will actually make it out of the house and to camp...they are just that tasty!


Maple Syrup Banana Muffins - printable recipe here

2 Tbsp canola oil
1 cup maple syrup
2 eggs
5 over ripe bananas
2 1/3 cups flour
2 1/4 tsp baking soda
1 tsp salt (or less if you prefer)
1 cup chocolate chips

Pre heat oven to 325

Whisk together the oil, maple syrup, and the eggs until the eggs are thoroughly mixed in.
Mash the bananas, add them to the liquids and mix it all up.
Add on top, but don't mix yet the flour, baking soda, and salt. Use a fork to quickly stir the dry ingredients before mixing them into the wet....this just saves dirtying another bowl!
Mix the dry and wet ingredients together until almost combined, add the chocolate chips and finish stirring until just combined.

Scoop into lined muffin tins (This made 24 muffins) and bake for 20 to 25 minutes...these ones took 25 minutes but always check at the earliest time.

Try to allow these little gems to cool first but try one if you must. (Remember, they are tasty warm but the flavours will have time to meld and these will taste even better the next day!)

Not too shabby!

Wish me luck at camp!

Until next time, stay warm and eat well!

Sunday, June 10, 2012

Your Salad is a Jar

What is with all these jars??
 I have another confession. I have become addicted to Pinterest. It is such a quick way to share and browse ideas and let me tell you, I have found some very neat things on Pinterest and these include ideas for the garden, the kitchen, and even ideas for work. One of these neat ideas, Hubby and I put together tonight for lunches this week! There have been some pins about using mason jars to layers salad ingredients for a quick and tasty lunch. Once assembled, the jars of salads are supposed to keep all week so you can make one for each day on Sunday, then all you have to do is grab a jar, some fruit and yogurt to go with it and you are set! We are trying this out for the week, even though I am going to camp with the grade 8s, Hubby will test the jar theory out for the week.

Wash out your jars so they are ready to go!

We splurged and bought new jars for this one!
 Once you get everything organized, washed, and chopped assembly goes fairly quickly.


We made both a lemon vinaigrette and a balsamic vinaigrette so we didn't have the same dressing the entire week.
Hubby seems to be having fun making his salads!
 After putting a couple tablespoons of vinaigrette in the bottom of the jar it is time to let the layering begin!!

 It is important to put the heavier/more sturdy items in the bottom of the jar so the dressing won't wilt the more fragile items.
 Keep the layers coming!

  Wrap an elastic band around the jar and tuck a fork underneath it (even a napkin!).


Store in the fridge for your grab 'n go lunches!! Remember to leave room so you can shake your salad up at lunch time.


Other things I've been up to (and may or may not have been found on Pinterest):

Growing celery from the end of the stalks.

Once the leaves are up, plant the entire bottom into the soil!
Freezing chicken with marinade in the sealer bag so it can flavour up while it thaws! (I also did this with a large pork loin which I was able to cut into 12 generous chops and 2 fair sizes loin roasts!) We are getting the freezer filled!
This is a ginger honey lime mixture....kind of looking forward to it!
I will get back to you and let you know how the mason jar salad experiment turned out.

Until next time, stay warm and eat well!